Information on digitizing videocassettes
Information about digitizing videocassettes
At Office Support, in our effort to get the best result every time, we constantly test different digitization methods and incorporate new processes/equipment/software into our provided services.
Since 2004, when we entered the industry, museums, companies, cultural associations, and individuals have entrusted us to digitize their significant memories from the past, which has prompted us to obtain ISO certification for these specific services as well.
At Office Support, depending on the type of material, we apply different digitization techniques so that all the information is transferred to the digital file. Let’s not forget that time negatively affects the quality of the content of video tapes, rendering the choice of the best digitization technique essential. Converting VHS to DVD or USB is a complex technical process that requires a lot of attention, at each stage, in order to get a perfect digital result.
If the time comes for you to digitize your archive, don’t settle for anything less than the best. Preserve your memories as beautiful, vibrant, and significant as they were when you created them.
Digitization method
There are two main categories of videocassettes: those recorded in analog and those recorded digitally. The first category includes tapes such as VHS, VHSc, Super VHS, Super VHSc, 8mm, Hi8, BETACAM SP, while the second category includes MiniDV (Standard or High Definition), Digital8, MicroMV, and others.
Διαβάστε περισσότερα
Each category requires a different digitization method to extract all the information (frames, sharpness, colour rendering, etc.). The most advisable method for digitally recorded videocassettes is connecting a computer to the playback device via the firewire port, while analog tapes require a connection with SDI (Serial Digital Interface), a digital signal capture card, an analog-to-digital signal converter, and a Time Base Corrector (TBC).
In addition to the above, it is equally important during digitization to use professional cassette playback devices, certified cables, a computer with an independent graphics card (GPU) and a modern processor (CPU), as well as suitable software that enables the adjustment of various parameters (brightness, aspect ratio, etc.).
However, it is worth pointing out that the decision to digitize our collection should not be based on factors such as time and equipment economy or ease of implementation. In this regard, there are many different solutions, primarily involving either recording the videocassette directly to DVD or connecting the video/camera to USB devices to capture the file on the computer, which are certainly cost-effective, fast, and easy to implement. The only certainty, though, is that choosing such a method will provide us with digital files that fall short of the original videocassettes.
Four factors that should be taken into consideration
The digitization of a file should be a one-time process. For this reason it is necessary that the selected method provides the best possible result.
At Office Support, having experimented with all methods, we have concluded that there are four key factors related to the digitization process that can significantly improve the quality of a video file. These factors are as follows:
1. Colour rendering (both black and the entire colour palette). To maintain the colour variety of a video file, chroma subsampling should not be applied and the equipment should be suitable to implement the 4:4:4 standard. This is the original resolution, in newer generation files, where there is no compression of any kind.
A video signal consists of 1/3 brightness (depicted in shades of gray) and 2/3 colour. While brightness is always in uncompressed form, most conventional digitization methods compress this chromatic information. Better colour rendering (avoiding chroma subsampling) contributes to a more “vibrant” and “fresh” image, thus including all the information from the original capture.
In Image 1, you can compare the produced result using the 4:4:4 standard and some other chroma subsampling methods.
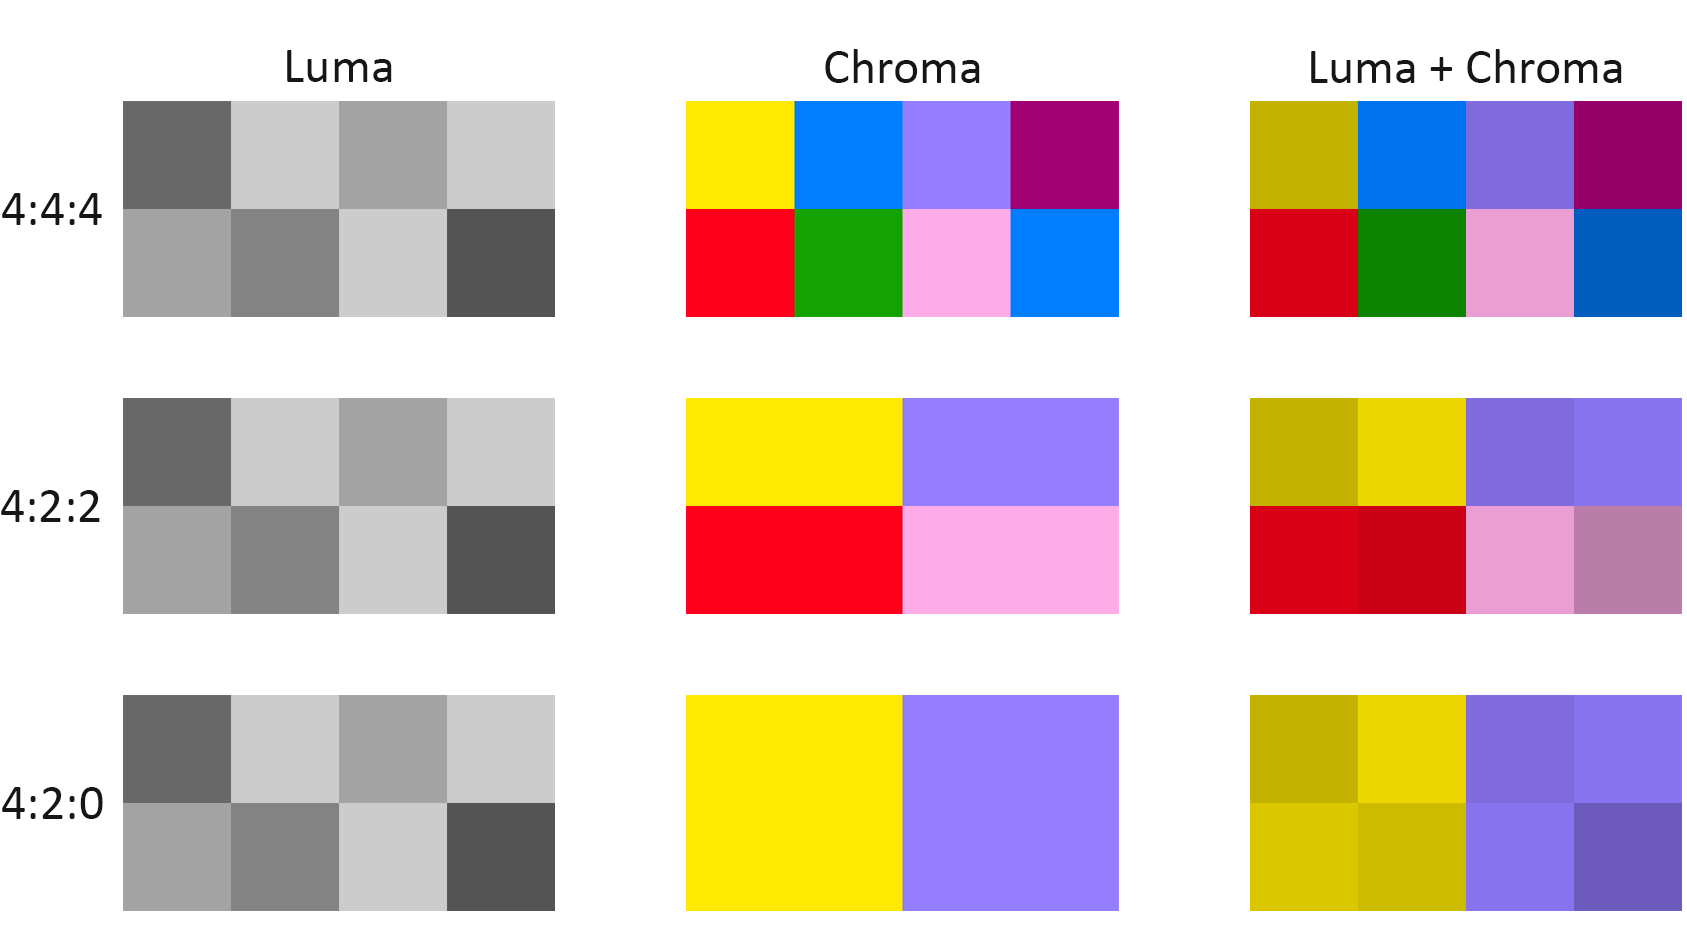
Image 1
In addition, another crucial factor that will allow us to have the entire colour rendering information of the original material is the colour depth or bit depth. Colour depth is the number of bits used in each pixel of the image to render colour. The devices used for video capture must have the capability to capture 8 or even 10 bits so that we get more colours and smoother transitions between them (see Image 2).
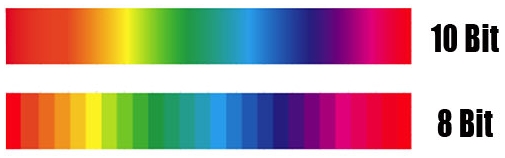
Image 2
2. Sharper image(clear outlines, no image artifacts). Perhaps not entirely perceptible to someone watching a digitized file (mainly because there are many frames in motion), but one thing is certain, a digital file from a cassette that has been digitized using conventional means contains much less detail –and therefore information– than a file created using the appropriate method. Therefore, the devices and cables used to convert the analog signal to digital should minimize jitter, simultaneously increasing the sharpness of the image, while the capture should not be done at a resolution lower than that of the original material. This should always be combined with everything mentioned earlier about colour rendering (bit depth and chroma subsampling), which helps accordingly.
3. More stable image. Video cassettes, especially VHS, have unstable signals. However, some videos may have auto-tracking, but most of the time, this too is not sufficient to maintain a stable image, i.e. frames succeeding one another without unwanted jitter. Therefore, in order to achieve as stable an image as possible, while minimizing interference, a TBC (Time Base Corrector) circuit should be inserted in the device wiring.
4. A fuller “frame” of the image. By “frame,” we refer to the outline of a video file, much like a frame hosting a photograph. If you have already digitized some of your video cassettes using conventional methods, you may have wondered why the video jitters at its outer margins. This phenomenon may not be noticeable on older analog televisions, where the image is slightly magnified, causing a portion of the information at the perimeter to be lost (overscan), but it becomes annoying when viewing the video on a digital television or computer screen, where the boundaries of the frame are precisely defined. As a result, along with the video, we see the annoying jitter at its edges. At Office Support, during the digitization process, we strive not only to retain information (colour, sharpness, etc.) but also to avoid introducing any “noise” into the image that is unrelated to the original material.